Quantcore circuits
Quantcore circuits is Quantcore’s design loop for superconducting-qubit chips, built on KQCircuits. You draw a chip,
check it, estimate its frequencies and couplings from a lumped circuit model (the LOM), simulate it in HFSS or Q3D,
compare the two, tune the geometry towards your targets and export the fab mask. One file, design.json, carries the
chip through every step:
draw → check (DRC) → LOM → simulate (HFSS / Q3D) → results → tune → fab mask
Design philosophy
Start with cheap estimates, spend solver time only where it pays, and feed every result back into the next geometry:
LAYOUT → LOM → EIGENMODE (per component) → FEM on the eigenmode’s mesh → extract and analyse → feedback
Layout. Draw the chip from real components with pins (KLayout plugin or Python). The layout is the source of truth, and every later step is computed from it.
LOM. The layout becomes a lumped circuit in seconds: f_q, α, f_r, g, χ, κ from component formulas. Fix the gross errors here, before any solver runs.
Eigenmode, component by component. Cut each qubit–readout group out of the chip and solve its eigenmodes in HFSS with the junctions as lumped inductors. Small boxes converge fast and show where the LOM is off.
FEM on the same mesh. Reuse the converged eigenmode set-up (box, mesh seeds, the mode frequency) for the driven and capacitance runs, so nothing is meshed again from scratch.
Extract and analyse. Read the results back, fill the LOM with the FEM values, and compute the Hamiltonian parameters (energy participations of the lumped junctions, χ, α, κ) next to the LOM’s estimates.
Feedback. Compare with the targets, propose the next geometry (lengths, claw sizes, L_J), rebuild, and go round again until every target is within tolerance. Then export the fab mask.
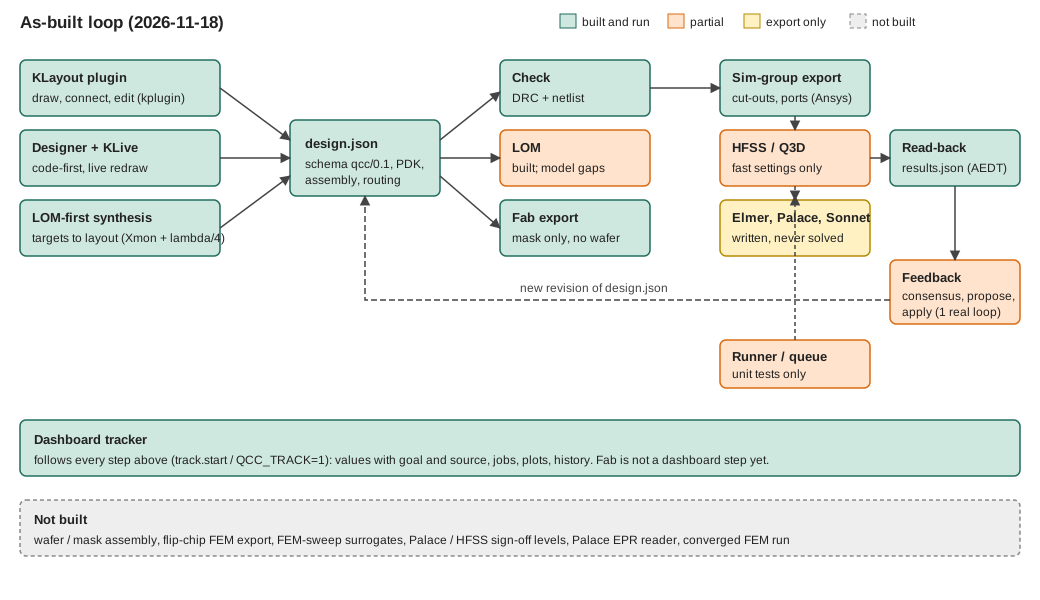
The loop as it is built today. Green: built and run for real. Orange: built, partly unverified. Yellow: solver input is written but was never solved. Grey: not built yet.
Where to start
You want to |
Start with |
|---|---|
Install it and build your first chip |
|
Know what is in the repository and how the pieces fit |
|
Design by clicking in KLayout |
KLayout plugin, then its Q1 + R1 tutorial |
Design in Python |
Python library and the tutorials |
Rebuild a published chip (IBM, Google, Qiskit Metal, KQC, …) |
|
Pick a component and see its pins |
|
Find an answer fast |
|
See what is built and what is left |